
Today we commonly feel the urge to move faster – take notice faster, learn faster, decide faster and act faster. It becomes a struggle. Still we can’t just decide: let's be faster. There are situations, behaviors, previous experience and other things slowing us down. Let's gather some analysis on what are the common situations asking for faster action, and what could be the simplest solutions at hand helping us find a way to move in a Fast Forward way (and mark those topics this way).
To start off, let’s address this simple point today: fast way of making easy to understand and easy to adjust mockups.
Usability and UX (user experience) are rather popular topics nowadays. For some it’s yet another fancy thing, for others it’s a tool for marketing, for some – an instrument for effectiveness. To create great UX, we strive to cover real needs in the best possible way we can imagine. The real need comes from people leading some kind of a process and/or being involved in it. In communication with a client, between team members, with stakeholders – in all communication it’s important to understand each other as good as possible. Visualizing ideas and interfaces – helps communicate, because we see the same picture before our eyes. Mockups are good as a general concept, but may become rather time consuming. Let’s see what can be done.
One of the solutions we came across is to use a spreadsheet application like Microsoft Excel. It’s commonly used, easy to adjust; most of the involved people are typically familiar with its usage.
Let’s see how to create those using Excel, step-by-step.
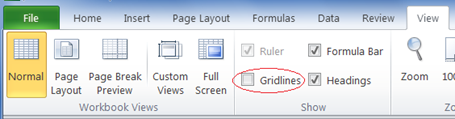
- Open new spreadsheet file and remove visible grid lines, choosing one of the approaches:
- switch off gridlines (recommended)
- or paint all lines white
- If you have an existing solution, you are about to develop further, take a screenshot* and adjust excel sheet in accordance with the screenshot; to do so, paste the screenshot into the spreadsheet. If you don’t have an existing solution to build upon, just follow the steps formatting in accordance to expected design:
- Screenshots put in a spreadsheet is easy to be moved around. Move it and adjust row height to match the screenshot row height. Add necessary text.

- Adjust text font and color - it’s easy to do and helps convey the look and feel. It doesn’t need to be perfectly the same, just being close is good enough.
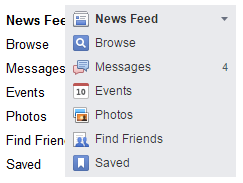
- Move the screenshot around and adjust column width and content.
- To quickly show a dropdown – type “6” and use Webdings font (for “News feed”). Other numbers also may become handy in different cases.
- Use “Insert symbol” for visualization. Whenever that is not sufficient, paste a real image instead.
- Complete the look: use empty columns to build the needed distance between pictures and text, fill the background.
* For taking screenshots in Microsoft Windows, Snipping is a handy tool. If you find anything else (e.g. Yandex Disk) easier to use – you are equally welcome to do so, of course.
- Screenshots put in a spreadsheet is easy to be moved around. Move it and adjust row height to match the screenshot row height. Add necessary text.
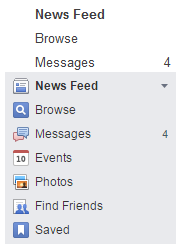
Let’s compare now: a mockup made in just a few minutes is more than good for starting or maintaining a productive discussion. It still may need some touch of a graphical designer – especially if you are planning to present the mockup to someone important or particularly picky, but it was not about the design – instead, it was about conveying a concept quickly.
Few more tips:
- Remove all unneeded sheets (empty sheets make other confused)
- Give sheets meaningful names for easy navigation
To make pictures of the mockup just select an area, copy, then paste in Microsoft Paint or another graphical editor of your choice. You have picture of the mockup usable in any way you need – to put in other mockup, to send by mail, to add to a document in whatever format, etc.
Keep in mind though that this way of copying will not include 1 pixel of the top and left border of the selected area (so it happens to work in Excel). To have it included you may use a screenshot tool or include one more column and one more row above before mockup area (both just a few pixels wide). Now select the area, including that column and line, and it will work just fine.
Immediate benefits of the approach:
- It’s quick to do
- It’s easy to adjust names, colors and add all the other elements of the UI
- It’s easy to give an opportunity to involved people to play around with the concept by themselves by making changes on their own – and now special software is necessary, all you need is Excel
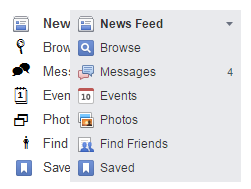
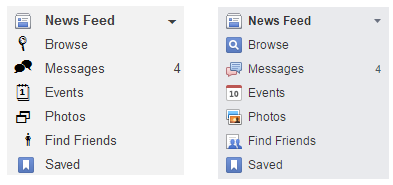
Following the steps outlined above, it’s relatively easy to quickly create lists like this one:
And with just a few clicks you can change the picture to look like this:
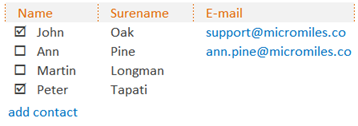
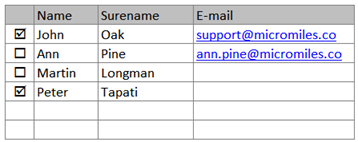
In case of Excel you may use formulas in the sheets to show calculation results and thus create an even more realistic feel. Having confirmed a design concept in such a way, you reduce the risk of change request popping up later in the process.
Also, using real formulas will come in handy later on in the development and testing process. How? With formulas being real, your mockup can be used as a precise executable specification for development and an invaluable source of information for creating test cases.
If you have questions about the topic or would like to discuss case at hand – feel free to contact us!
 |
About the author: Andris Bariss is an enthusiast of business processes’ development with more than 20 year experience in analysis and improving of business processes and development of IT solutions. Experienced in both mass market and custom solutions, Andris is always looking for a complete overview of a problem or situation, in order to evaluate causal relationship and to develop the best possible solution. Developing himself as a usability expert, passionate for a good user experience. |


